|
|
 |
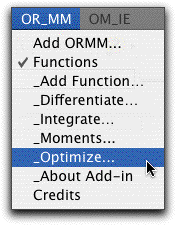
Functions |
 |
-
Summary |
| |
Before providing detailed
descriptions of the features of the add-in, we summarize
the commands of the add-in using a simple function with
one independent variable:
This simple function allows analytic evaluation
of the quantities that the program estimates numerically.
The computations of the add-in are applicable to functions
of several variables. |
|
| |
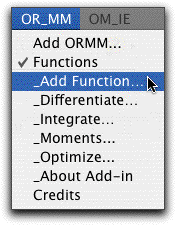
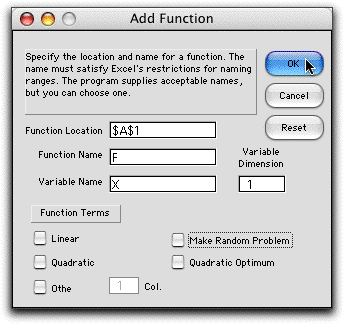
To define a function,
choose Add Function from the menu. The dialog below
is presented. The Function Location holds a cell designation
from the worksheet. The function form is placed below and to
the right of this cell. The initial value is the location of
the active cell when the dialog is presented. The location may
be manually changed. The $ signs need not be included in the
cell address. The Function and Variable names
are automatically generated by the program. They can be changed,
but the revised names must have no blanks or punctuation. A
function or variable name can be used only once in a workbook.
The number of variables is entered in the Variable Dimension
box. For the example the function has only one variable.
We explain the remainder of the checkboxes on the Add
Function page. |
| |
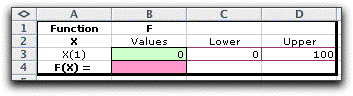
Clicking OK places the form on
the worksheet as below. This is the simplest form with a single
variable. The green area in cell B3 holds the Value
of the variable. The program will vary this cell, but the user
may experiment with the value. Cells C3 and D3, outlined in
maroon hold the Lower and Upper limits of
the variable and are to be set by the user. The pink cell B4
is to hold the function to be analyzed. The pink color indicates
that the user is to provide an Excel function that depends on
the value entered in cell B3.
The figure below shows the form after the function
has been entered. Cell B4 how holds the function to be analyzed.
All Excel functions must begin with an "=" sign. Excel
has computed the value for x = 0.5. Note that the function
uses the term X_Value. This is an Excel name that identifies
cell B3. The name is automatically created by the program.
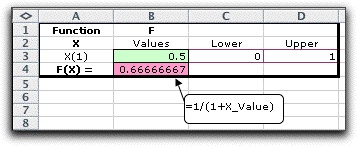
In general, the computation of the function may
use many cells outside the form and be very complex. Only the
result of the final computation must be placed in the function
cell of the form. |
Differentiate
| |
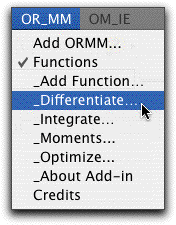
To differentiate the function
choose Differentiate
from the menu. The dialog below determines the location of the
analysis and the function to be analyzed. The analysis results
must be on the same worksheet as the form containing the function.
Its location should be chosen so that the output will not overwrite
important data on the worksheet.

The checkboxes at the left indicate what derivatives
are to be computed. Diagonalization is possible only if the
Hessian is also checked. Derivatives are estimated
numerically with the step size indicated in the third field
from the top.
|
| |
The results of the analysis are
shown below. The derivatives are estimated for the value of
the variable set in the function definition, B3. That value
is repeated in G3 along with the value of the function in G4.
The gradient has a single dimension that is the derivative of
the function with respect to x. Analytically, the derivative
is:
This result is estimated numerically and is reported in cell
H3. To find the derivative, the program changes the value of
the variable in B3 and observes the result in B4. With one variable,
two evaluations are required to estimate the derivative.
With one variable, the Hessian matrix is simply the second
derivative. Three function evaluations estimate this value.
Analytically the second derivative is:
The program approximates this result and shows
it in cell I3. With only one dimension, the Diagonalized
matrix and the Linear Transformation matrix provide
no additional information. The analysis starting in column K
indicates that the point (0.5) is not a stationary point because
the gradient is not zero and the point is not at a boundary.
Since the second derivative is positive, the Hessian matrix
is positive definite. This indicates that the function is convex
at this point. |

Integrate
| |
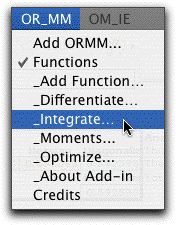
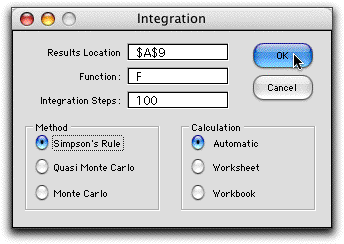
To integrate the function, choose
Integrate from the menu.
The dialog selects the function to be integrated and the number
of steps in the integration. Three numerical methods are provided.
Simpson's rule is an accurate method for continuous functions
and a small number of variables a moderate number of integration
steps. It is only available when there are no more than four
variables of integration. The other methods are applicable when
the integral is over several dimensions.
|
| |
The results of the integration
are shown below. Simpson's Rule is a numerical integration method
that is quite accurate for a single variable of integration
and the function is continuous. The results are shown below
in cell B12. The top line of the form shows the function integrated,
the method of integration, and the number of observations used
for the integration. The cells in row 11 show the variable of
integration and the range of integration. The range of integration
is set in the function form.

For the example, the integral can be computed
exactly as:
The result of Simpson's rule is quite accurate
and the accuracy can be improved by choosing a larger number
of integration steps.
The Monte Carlo alternative is invoked by clicking the appropriate
button on the dialog. We enter 100 as the number of integration
steps, but that number is rounded up to the nearest multiple
of 30, 120 in this case.

For the Monte-Carlo integration method, a fixed number of observations
of the independent variables are randomly selected, 120 in this
case. The average objective function value of the observations
multiplied by the range provides an estimate of the integral,
presented shown in cell B18 below. Since the result is a random
variable, we can estimate the standard deviation of the integral
estimate, presented in cell B19. The observations are considered
in samples of 30 to obtain an estimate of the error of the estimates.
Because of the Law of Large Numbers the mean of the sample means
are Normally distributed, so we use the Normal distribution
to provide a confidence limit for the integral. The confidence
level in B21 can be changed by the user. Formulas in cells C21
and D21 show the range of the confidence limit.
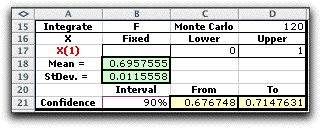
The range of integration is shown in C17 and D17.
These were copied from the cells C3 and D3 in the function form.
The confidence limits are rather wide with only 120 observations.
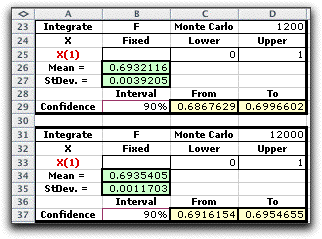
Estimates with larger sample sizes are shown below. According
the Law of Large Numbers, to decrease the standard deviation
of the estimated mean by a factor of 10 requires an increase
in the sample size by a factor of 100. This is approximately
observed in the example where the standard deviation is 0.0126
for a sample size of 120 and 0.0010 for a sample size of 12,000.
|
Moments
| |
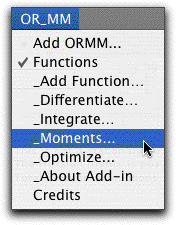
This command computes the moments
of the function for a selected variable. The Moment
dialog sets the location for the display and the function for
the analysis. When the number of variables is greater than one,
the third field indicates the variable for which the moments
are to be determined. All other variables are fixed to the values
set on the function form. The current example has only one variable.

The moment calculations require an integration
over the range of the variable. The program has three methods
for performing the integration. Since the example has only one
variable we choose Simpson's Rule. The function will be plotted
using the steps entered at the lower right. |
| |
The results of the moment analysis
are placed on the worksheet at the specified location. The analysis
computes the values of the function for the number of steps
required and normalizes the results so that the total area for
the function is 1. The first result, Constant, is the
area under the function. We normalize the function by dividing
each of the observations by this constant. Because of the normalization,
the function represents a probability density function. The
remaining lines on the display show the moments for this density
function. The meanings of the values calculated are given on
the Moments page of this
section.

The program then evaluates the function at the required number
of steps. The function values are shown in the chart. The values
in the X(1) column are the midpoints of the integration
ranges. For a given range the value of the function, F(x),
is the average of the function values for the several points that
fall in the range. The counts of the number of points in the the
ranges are shown in the Count column.

|
Optimize
| |
To optimize the function choose Optimize
from the menu. The dialog presents the option of maximizing
or minimizing and the choice of starting solution. The Demo
option steps through the process with dialog boxes explaining
the sequence of steps in the process. The Run option
performs the search technique, stopping only when one of the
stopping criterion is satisfied. The check boxes select the
information to be displayed on the worksheet.

|
| |
The program uses the
simple gradient direct search technique. At each step,
the gradient of the function is numerically estimated. For a
maximization, the program searches for the maximum along the
line defined by the gradient. For this single variable problem,
the gradient points toward 0 from any nonzero starting point.
The first line search reaches the point providing the maximum
function value, x = 0. |
| 
|
| |
For a minimization, the search
is in the reverse direction of the gradient and the search seeks
a minimum along the line. The minimum is at x = 1. |
| |
|