|
|
 |
|
Decision
Analysis
|
|
|
 |
Decision
Analysis |
 |
-
Model Dialog |
|
|
 |
Constructing the Model
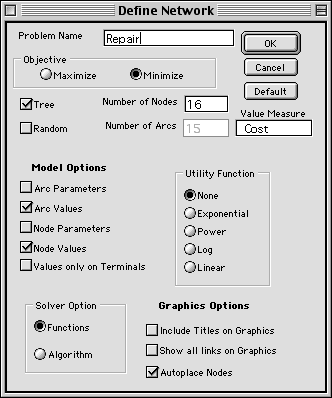
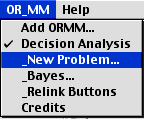
To begin the model construction process, select New Problem
from the OR_MM menu. The dialog shown below is presented to
accept the data for the model. In the following we describe
the components of the dialog.
Some of the options set on the dialog can be changed with the
Change Structure button that will be described later.
|
|
|
Control Buttons
|
The buttons at the upper right open and close the dialog
and provide default values for the settings. When the
model is complete, press the OK button to build the model
worksheet. The Cancel button closes the dialog without
effect. The Default button fills the fields and sets the
buttons for a 20 node model. |
Name
|
The name should be representative of the situation under
consideration. It should be a single word with no punctuation
and start with a letter. A number of named ranges are
created on the worksheet, so the name must obey the range
naming restrictions of Excel. The program automatically
creates names with the prefix DEC. The automatic name
can be changed. |
Objective |
The objective of the decision process is to maximize or
minimize the expected value of some criterion represented
by the values on the decision tree. The option is set
with these buttons. |
Tree
|
This checkbox indicates whether the decision network is
a tree or a more general network structure. The computational
procedures assume that the decision process describes
a directed network with no cycles, but it does not require
that process take the form of a tree. It is often true
that the size of the model can be considerably reduced
by using a non-tree structure. An example is presented
later.
The Repair example does have a tree structure, so the
box is checked. For the tree structure it is only necessary
to specify the number of nodes. The number of arcs is
always one less.
|
|
Random
|
When this box is checked, the program builds the model
with randomly generated data. The random generation procedure
produces valid decision tree models with at most two arcs
leaving each node. This option is useful to create large
sample models without data entry. |
|
Numbers of Nodes and Arcs
|
These are the size parameters of the tree. They can be
easily changed as the model is constructed. For the example,
we enter the known values for the Repair model.
The minimum sized tree has three nodes and two arcs.
It is often convenient to begin with this minimal tree
and add related nodes and arcs in a sequential manner.
|
|
Value Measure
|
The model will maximize or minimize some quantitative
measure, perhaps to maximize profit or minimize cost.
It is useful to enter the name of the measure here. The
text is used as part of the names of some of the columns
on the worksheet display. |
|
Model Options
|
These checkboxes determine which columns are included
in the arc and node displays of the worksheet. Since the
example has test costs that are conveniently represented
on the arcs we have checked the Arc Values box.
The terminal nodes also have costs, so we have checked
the Node Values box. With this option, all nodes
can be assigned costs, however, when the button labeled
Values only on Terminal Nodes is checked, the solution
process only considers the values on the terminal nodes.
Node and arc costs are accumulated by the solution
process when the process goes through the associated
nodes and arcs. For example, the cost of test X is only
expended if the decision is to do the test. Alternatively,
the cost of replacing the motherboard associated with
node 2 is expended if the test is not made. Any solution
objective will include only one of these two values.
It is always possible to represent all objective values
only on the terminal nodes. Every terminal node identifies
a unique path through the decision tree, so all values
along this path can be accumulated and assigned as the
value for the terminal node. For example the cost for
node 11 can be computed as the costs of tests X and
Y plus the cost of repairing component A, a total of
220. If this is done, the Arc Values option should
be left blank and the Values only on Terminal Nodes
should be checked. This option usually requires
a good deal of extra computation, so we have decided
to specify arc values for the example.
The Arc Parameter and Node Parameter boxes
are strictly for convenience. For some models, arc and
node values and arc probabilities are computed with
Excel functions that have parameters. When these boxes
are checked, columns are provided to hold the parameters.
|
|
Utility Functions
|
Decision makers sometimes do not make decisions strictly
on the basis of the expected value of outcomes governed
by probability. Rather risk plays a role in judging alternatives.
Decision analysis handles this by using utility functions
to transform an objective measure so that it represents
the risk in a situation. The program allows several standard
utility functions. We discuss this in a later section.
When utility functions are used, the model must be
specified as a maximization and objective values are
allowed only on the terminal nodes. The program associated
with the dialog box enforces these restrictions.
|
|
Solver Options
|
The model is solved by a process that begins at the terminal
nodes and works backwards until all chance and decision
nodes have been evaluated. The solution specifies the
optimum decision at each decision node. The program allows
two procedures for performing the solution process: functions
and algorithm.
The Function option uses Excel functions provided
by the add-in to evaluate the decision nodes. The solution
is determined automatically by the program. This is
often useful for sensitivity analysis. A change is immediately
reflected in objective values and decisions.
The Algorithm option is called by clicking a
button on the worksheet. The solution is only obtained
when the button is clicked. This option is usually better
during the construction process of the model.
|
|
Graphic Options
|
The model structure and data are held in lists of nodes
and arcs that are placed on a worksheet. It is often useful,
however, to see a graphical representation of the model.
A button is placed on the data worksheet that when clicked
builds a graphical representation on a second worksheet.
The material placed on the graph depends on the buttons
checked in the model dialog. The graph for the example
is shown below.
The graph identifies the three types of nodes by color,
beige for decision, blue for chance and gray for terminal.
Within the decision node, we see the name, node value,
optimum value and optimum decision. Within the chance
node we see the name, node value, and expected value.
A terminal node only shows the name and node value.
When the Include Titles button is checked, titles
appear to the left of the numerical values. This makes
the graphic larger, so we have not chosen this option
for the example.
The arcs connecting the nodes are show on the figure
with arrowheads indicating direction. The numbers above
the lines are the arc values, while the numbers below
the lines are arc probabilities. The optimum decisions
are shown with the red arcs. For a tree network, all
the arcs appear on the graphic, but for more general
network structures, some arcs may crossover the nodes.
In this case it may be better to leave the Show all
links button unchecked.
With the Autoplace button checked, the program
selects the relative locations of the nodes on the graphic.
These are controlled by the Level and Depth columns
of the node display. The Level of a node indicates the
placement of the node from left to right. For example,
node D1 is at level 0, while node A is at level 4. The
Depth of a node indicates the placement of the node
from top to bottom. For example D1 is at depth 0, while
the node labeled A, B, E is at depth 5. The program
does a pretty good job of placement, however, the user
might want to control the placement manually by specifying
the depth and level for each node.
|
|

|